Introduction
Managing user submissions and synchronizing them across a database can often feel like a daunting task, especially if you want to empower non-technical team members to manage the data. What if you could use Google Forms for data input, Google Sheets as an intuitive, lightweight Content Management System (CMS), and have it all magically sync to a live database?
In this article, we will walk through building exactly that. You will learn how to capture data from a Google Form, seamlessly log it into a Google Sheet, and use Google Apps Script to automatically push, update, and delete records in a Firebase Firestore database.
By the end of this tutorial, you’ll have a fully functional, automated pipeline that requires absolutely no direct database manipulation by your admins. Let’s dive in!
Architecture Overview
The data in our system flows through four key stages:
- Google Form (Input): A simple, user-friendly form for prospective clients, attendees, or team members to submit new details.
- Apps Script (Form Trigger): An
onFormSubmittrigger captures the form submission and appends the incoming data as a new row in our connected Google Sheet. - Google Sheet (CMS Dashboard): The central administrative hub. Here, an admin can review the incoming submissions, approve them via a simple checkbox, edit text directly in the cells, or delete records entirely.
- Apps Script (Sheet Trigger) & Firestore (Live Database): An
onEdittrigger living inside the Google Sheet detects any changes made by the admin. It securely authenticates with Firebase via a service account and performs the corresponding action (Create, Update, or Delete) directly in the Firestore database.
Step 1: Form Setup
The first step is to create the public-facing entry point for our data.
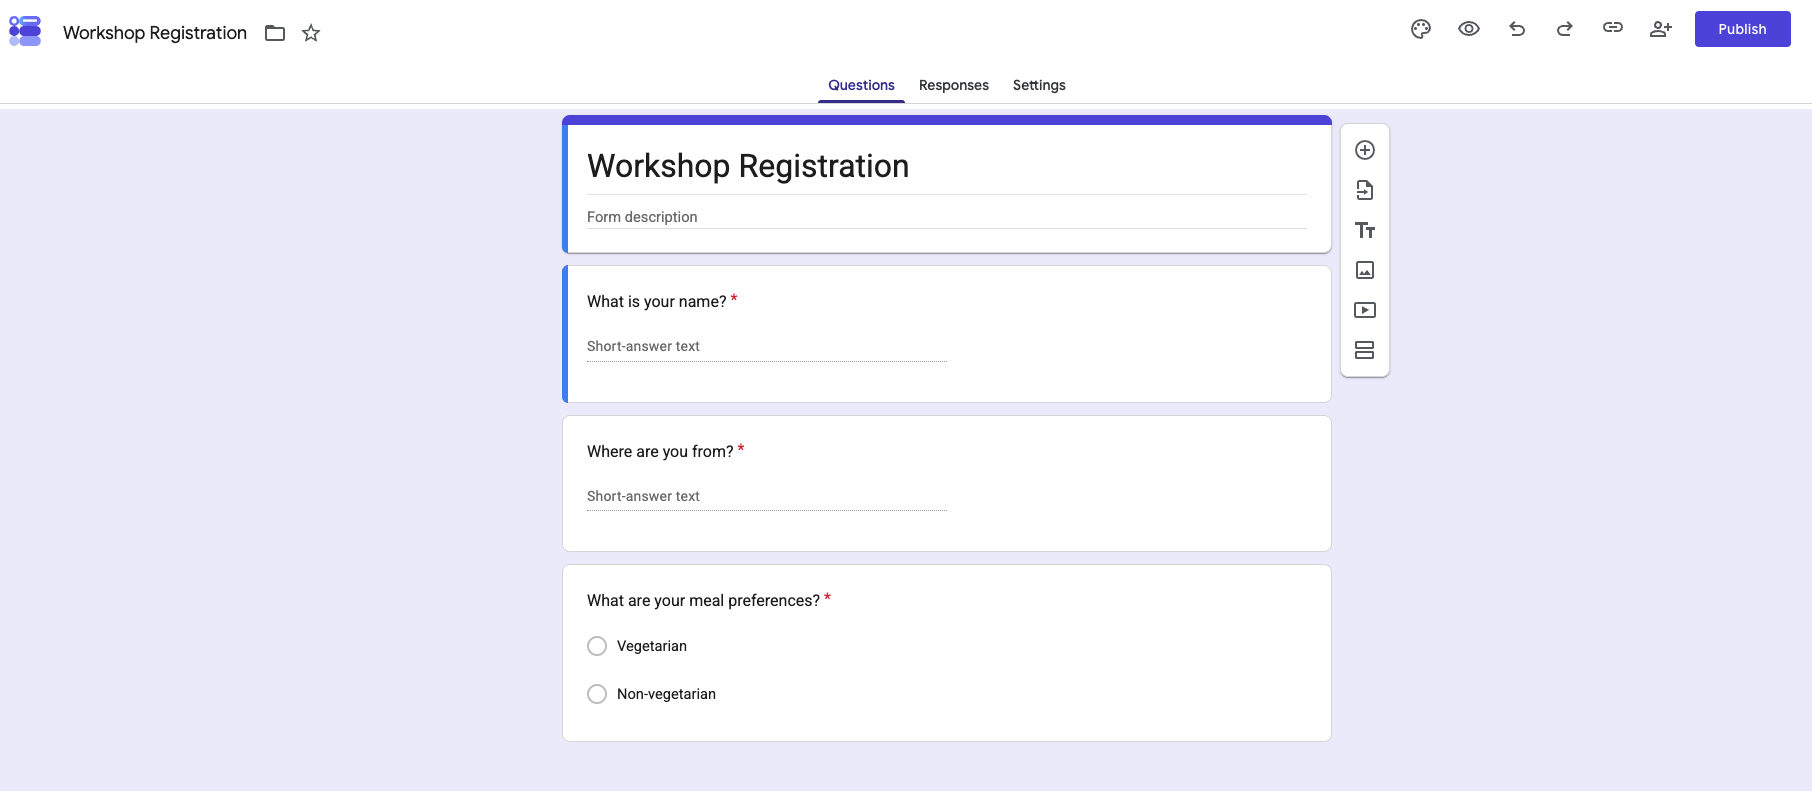
- Go to Google Forms and select Blank form. While any template would technically work, starting blank keeps things simple for this tutorial.
- Double-click on Untitled form at the top and give it a suitable name. For this example, let’s call it
Workshop Registration. - Add a few fields to gather attendee data using the circular (+) button on the right-hand menu.
- Ensure you mark every field as Required by toggling the switch at the bottom right of each field block.
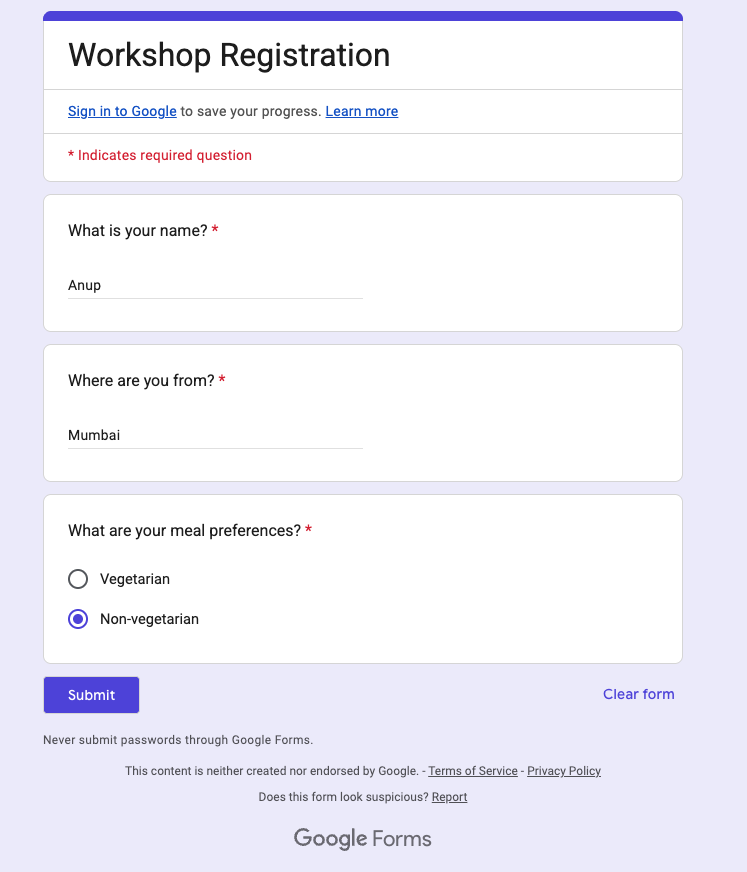
For our workshop example, we will collect:
- Attendee Name
- Attendee Location
- Meal Preference
Step 2: Sheet Setup
Next, we need to set up the spreadsheet that will act as our lightweight CMS.
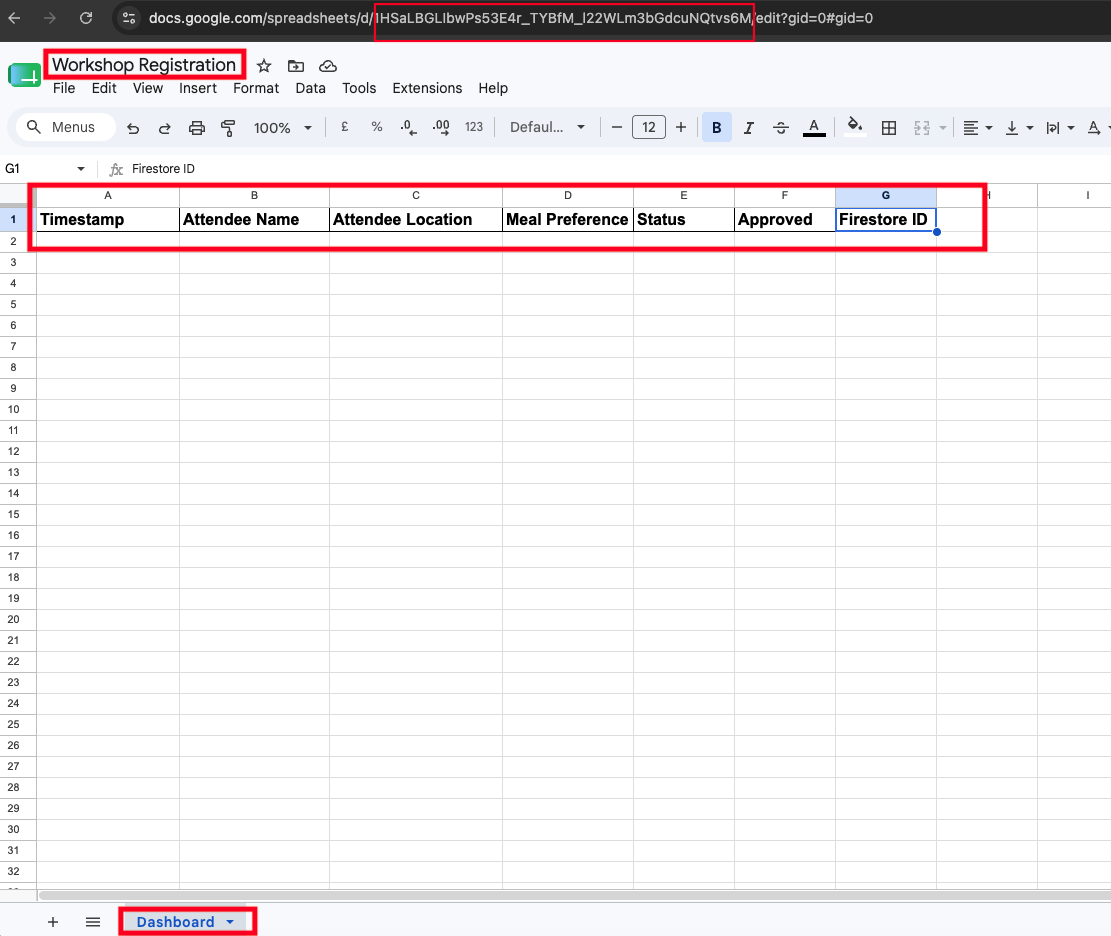
- Go to Google Sheets and select Blank spreadsheet. Avoid using a template, as we need strict control over our columns.
- Double-click on Untitled spreadsheet on the top left and give it the exact same name as your form:
Workshop Registration. Naming them identically makes it much easier to keep track of your assets in Google Drive. - At the bottom of the screen, double-click the default sheet tab (
Sheet1) and rename it toDashboard. - Set up the following column headers in Row 1, from Column A to G:
- A:
Timestamp - B:
Attendee Name - C:
Attendee Location - D:
Meal Preference - E:
Status(This will be updated automatically by our script) - F:
Approved(This will hold the interactive admin approval checkbox) - G:
Firestore ID(This will be populated automatically by our script once synced)
- A:
Step 3: The Automation Layer (Google Apps Script)
This is where the magic happens. We are going to implement two separate scripts: one linked to our Form, and one linked to our Sheet.
Part 1: The Form-to-Sheet Connector
This script will run every single time a user successfully submits your Google Form.
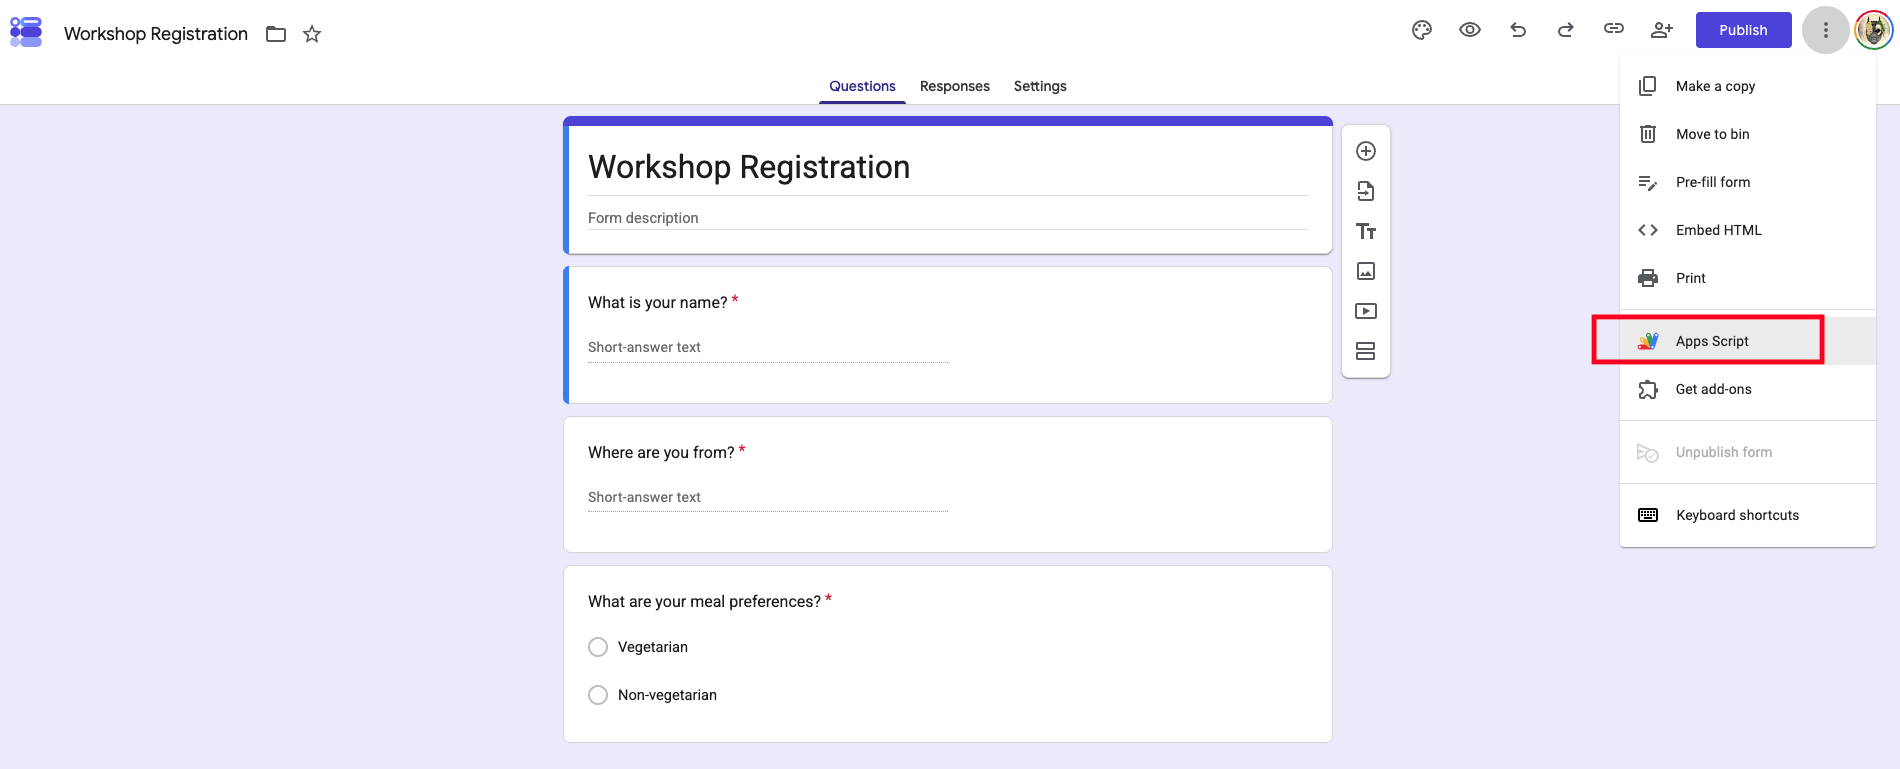
- Open your Google Form, click the three-dot menu (⋮) in the top right corner, and select Apps Script.
- A new tab will launch containing a
Code.gsfile with an emptymyFunction()template. - Delete the boilerplate code and paste the exact code provided below.
- Important: Replace
"YOUR_SPREADSHEET_ID"with the actual ID of your Google Sheet. You can find this ID in your Google Sheet’s URL (it’s the long string of characters between/d/and/edit). - Rename the project at the top left from Untitled project to
Workshop Registration Form Script. - Click the Save project icon (the floppy disk) in the toolbar.
// The ID of the Google Sheet where promotions are managed.
const SPREADSHEET_ID = "YOUR_SPREADSHEET_ID";
const DASHBOARD_SHEET_NAME = "Dashboard";

// The column number where the "Approved" checkbox should be added, Column 'F' in our case.
const APPROVED_COLUMN_INDEX = 6;

function handleFormSubmission(e) {
  try {
    console.log("--- handleFormSubmission Trigger Fired Successfully ---");

    const spreadsheet = SpreadsheetApp.openById(SPREADSHEET_ID);
    const sheet = spreadsheet.getSheetByName(DASHBOARD_SHEET_NAME);

    // Extract responses and format them for the new row.
    const responses = e.response
      .getItemResponses()
      .map((itemResponse) => itemResponse.getResponse());
    const newRowData = [new Date(), ...responses, "Pending"]; // Default status is "Pending"

    sheet.appendRow(newRowData);

    // Add the approval checkbox to the newly created row.
    const newRowIndex = sheet.getLastRow();
    sheet.getRange(newRowIndex, APPROVED_COLUMN_INDEX).insertCheckboxes();

    console.log(
      "✅ Successfully appended new attendee and added 'Approved' checkbox.",
    );
  } catch (error) {
    console.error("❌ A FATAL ERROR OCCURRED: " + error.toString());
  }
}
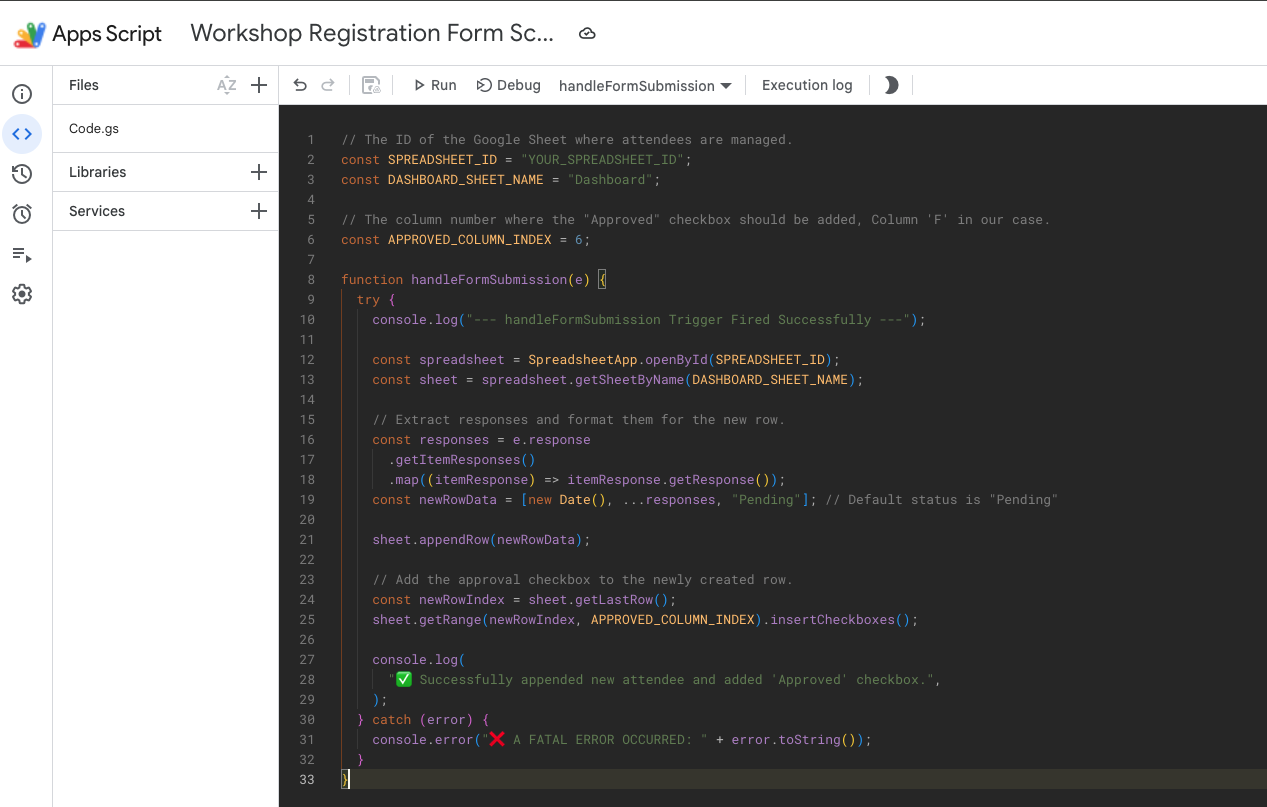
Activating the Form Trigger
For this script to run automatically, we need to attach it to a trigger.
- In the Apps Script editor, click the Triggers icon (which looks like an alarm clock) on the left-hand sidebar.
- Click the + Add Trigger button in the bottom right corner.
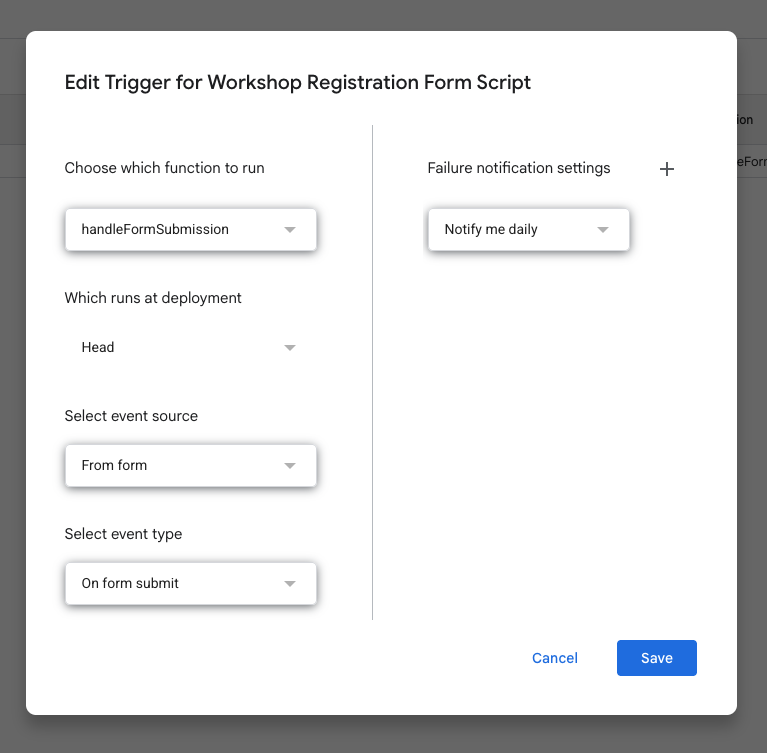
- Configure the trigger with these exact settings:
- Choose which function to run:
handleFormSubmission - Select event source:
From form - Select event type:
On form submit
- Choose which function to run:
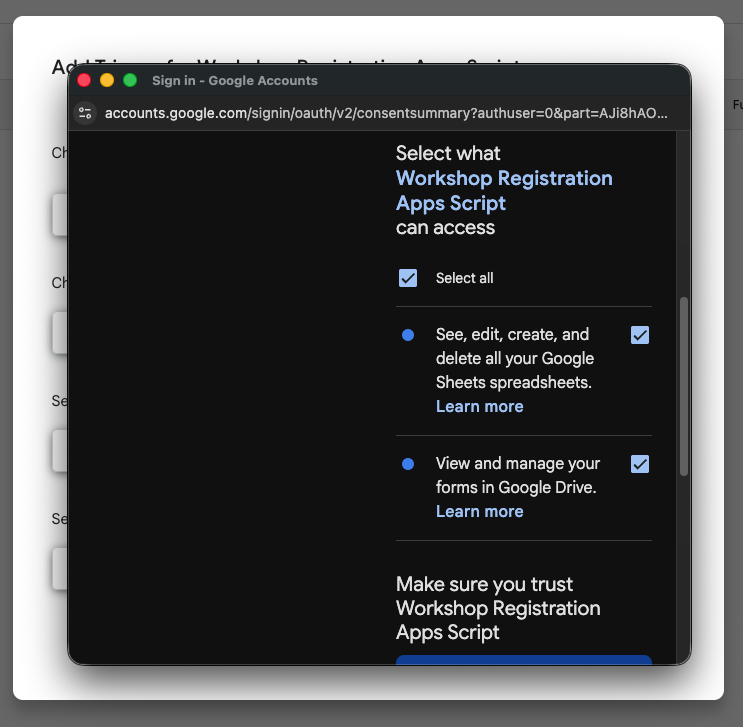
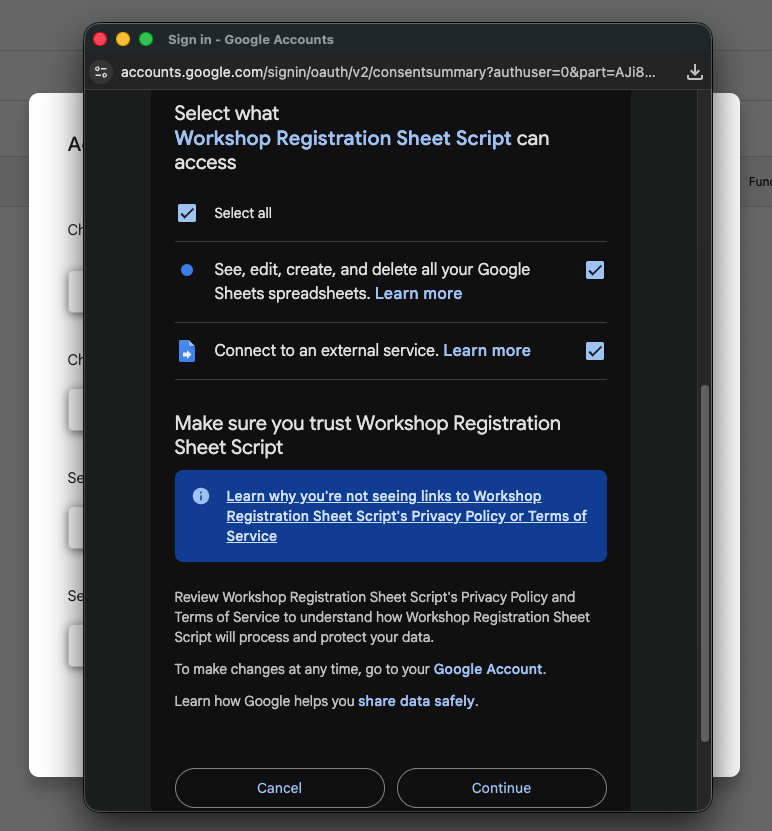
- Click Save. Google will pop up a window asking you to authorize the script.
- Choose your Google account. You will likely see a “Google hasn’t verified this app” warning.
- Click on the Advanced text hyperlink at the bottom.
- Click on the Go to Workshop Registration Form Script (unsafe) link.
- When asked to “Select what Workshop Registration Form Script can access”, click the Select All checkbox, scroll to the bottom, and hit Continue.
- You will be redirected back to the triggers page, where your new trigger will now be visible.
Step 4: Firebase Setup
Now we need a place to securely store our live data.
-
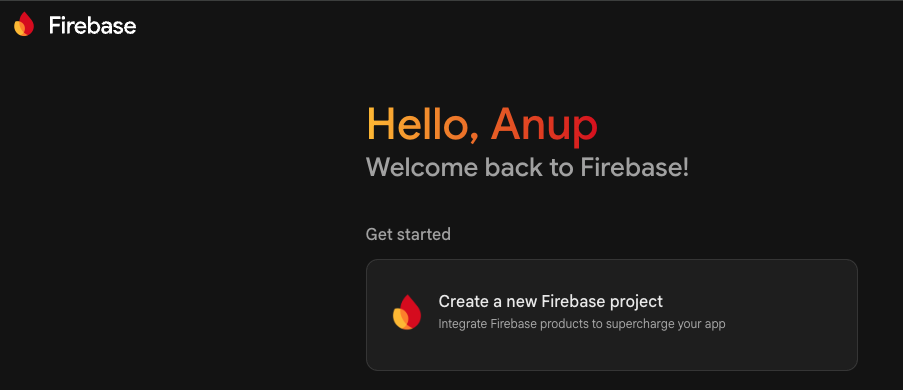
Go to the Firebase Console and click Create a project (or Add project).
-
Enter a name, such as
Workshop Registration. You can edit the unique identifier (project ID) below the text field if you wish. Click Continue.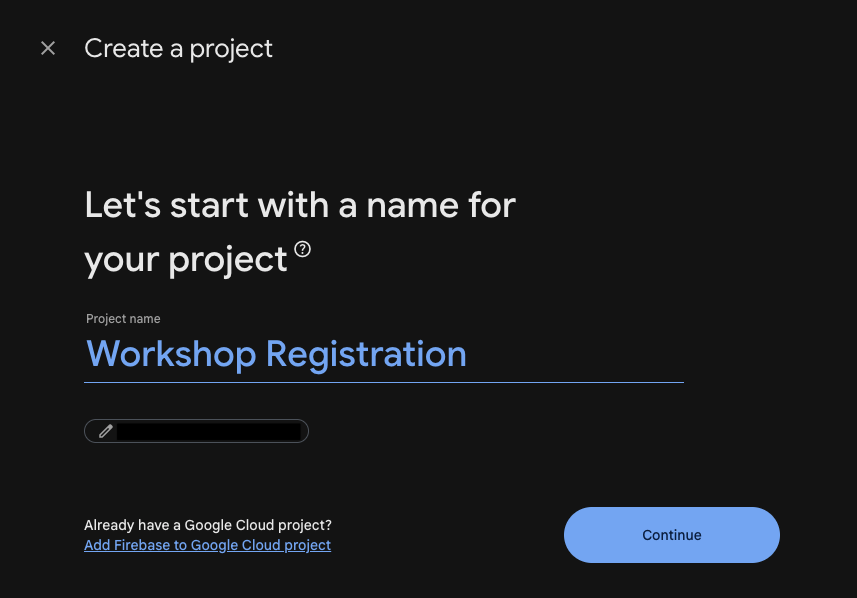
-
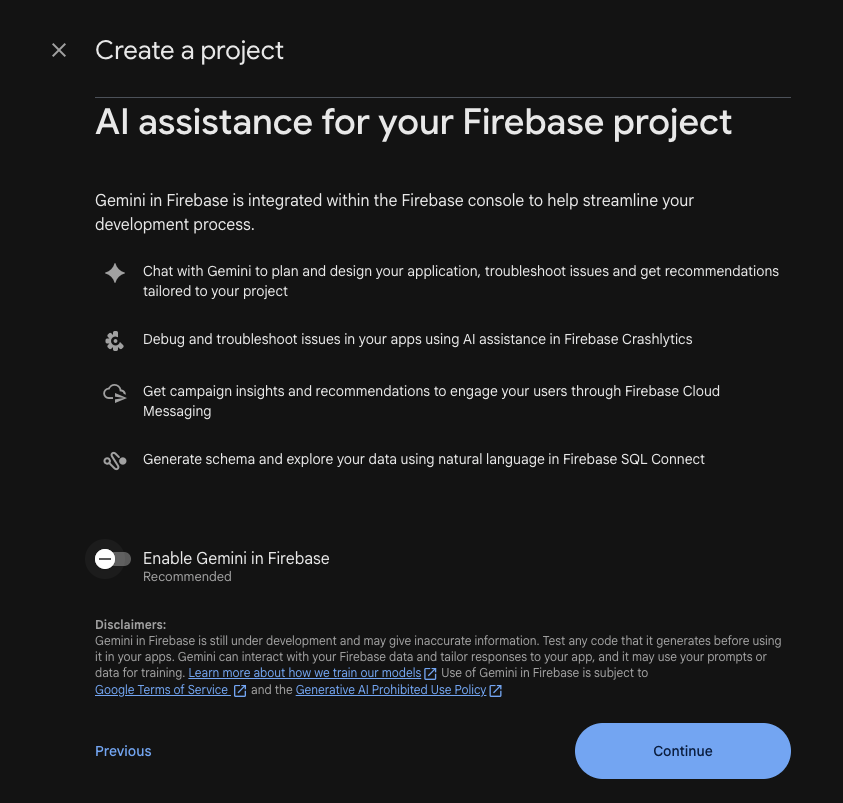
You can toggle OFF “Enable Gemini in Firebase” as we won’t need AI assistance for this project, then click Continue.
-
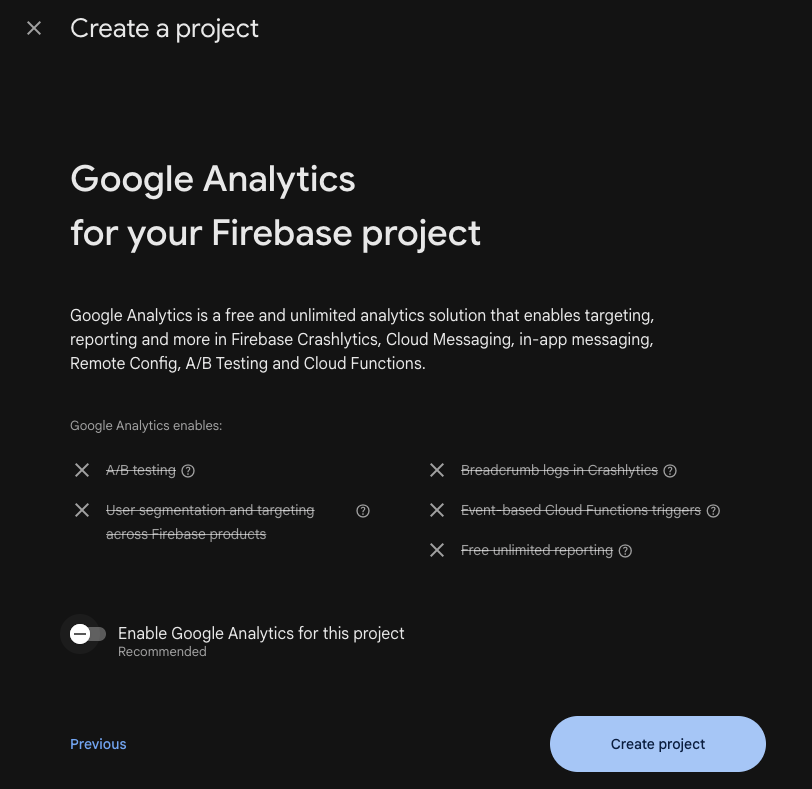
You can also toggle OFF “Enable Google Analytics for this project” to keep things clean and simple, as analytics are out of scope for this backend implementation, then click Continue,
-
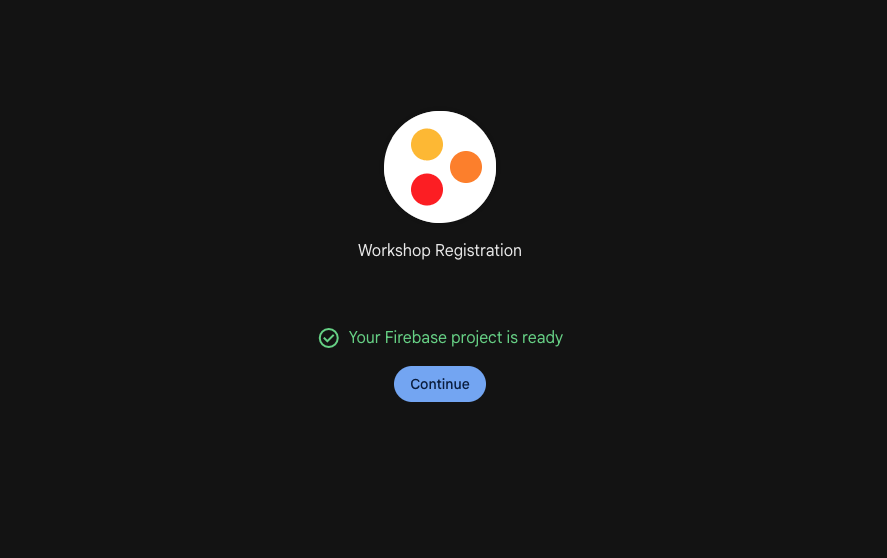
Click Create project. Wait a few seconds for the setup to finish, then click Continue.
-
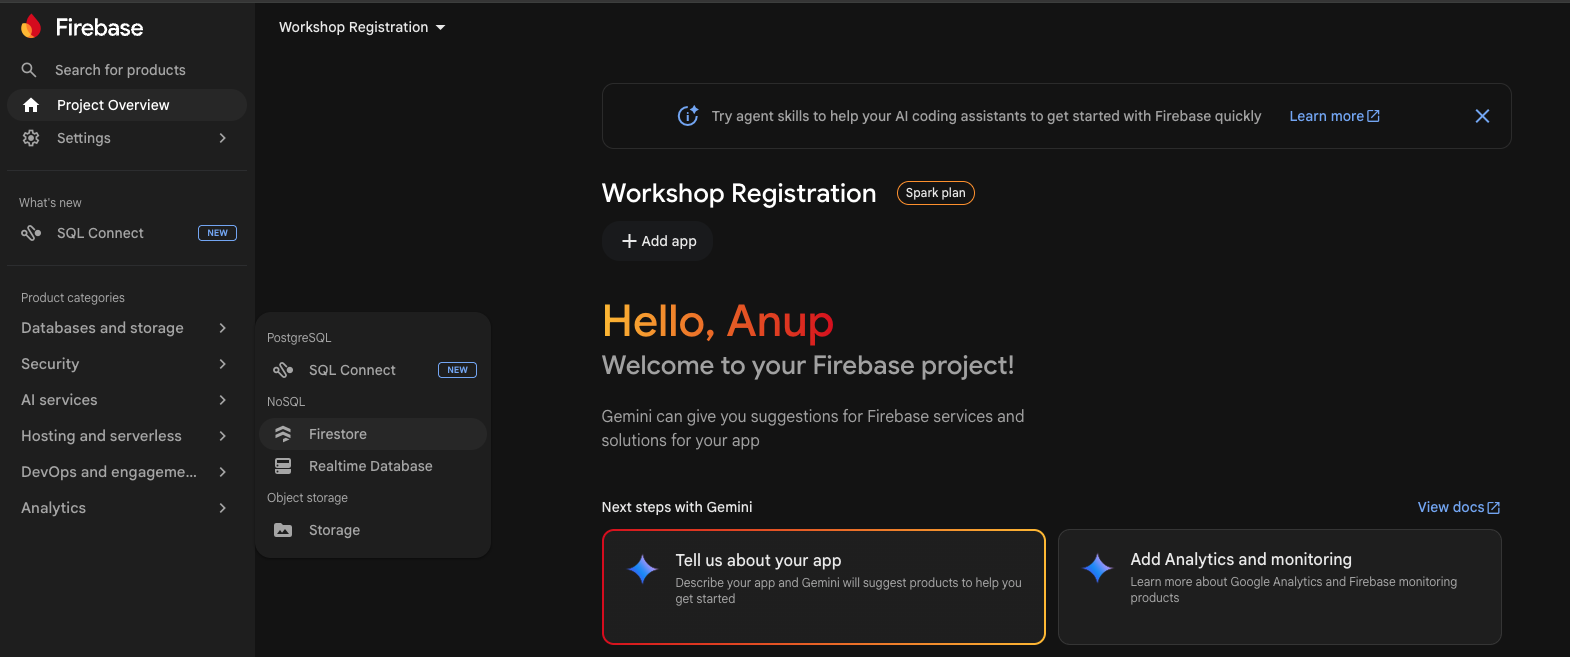
From your new project dashboard, expand the Databases and storage menu on the left sidebar and select Firestore.
-
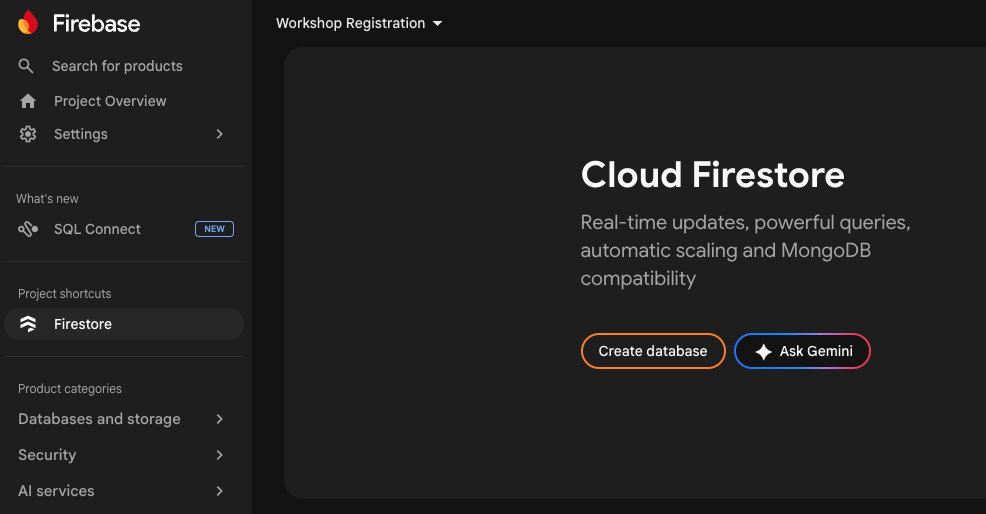
Click the Create database button.
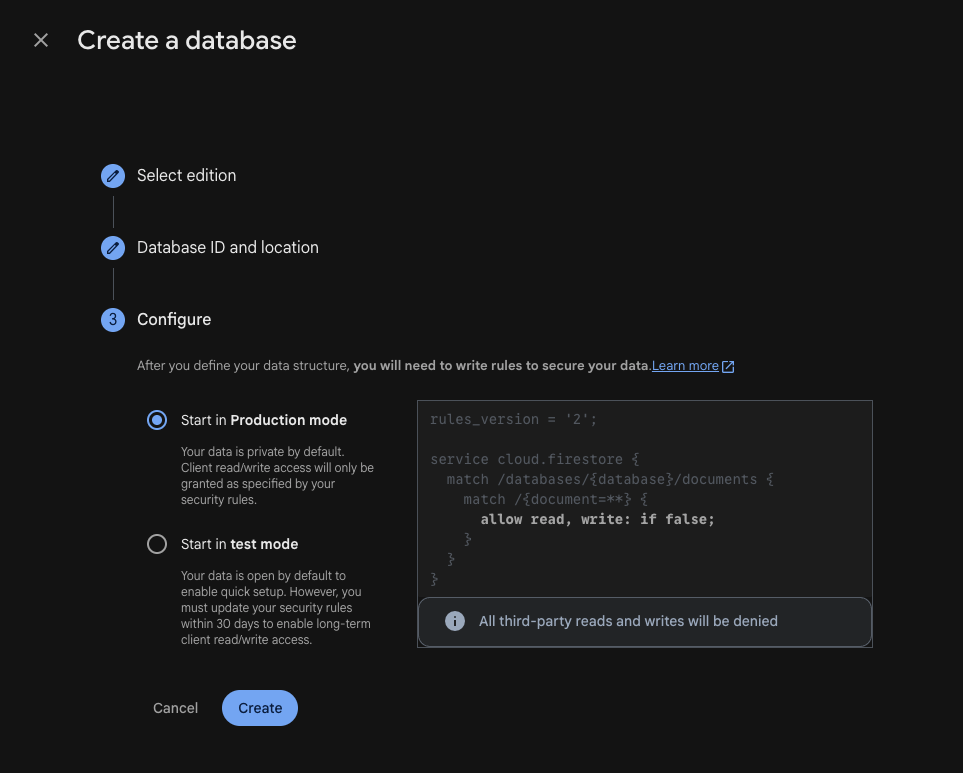
- Select Standard edition and click Next.
- Leave the Database ID as
(default), choose a physical server location closest to your target users, and click Next. - Choose Start in Production mode and click Create.
Configuring Firestore Security Rules
By default, production mode locks down your database completely. We need to allow our front-end applications to read the data, but prevent anyone from writing to it directly (since our Google Sheet will handle all the writing).
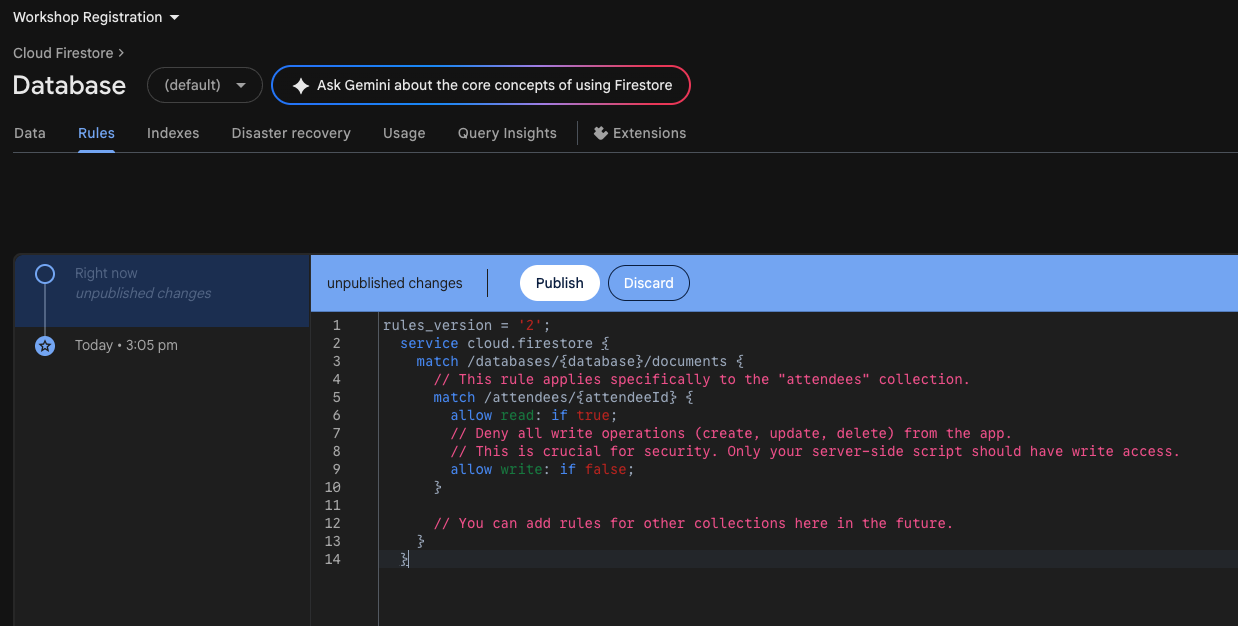
- Inside your Firestore Database page, click on the Rules tab.
- Replace the existing boilerplate rules with the following secure configuration:
rules_version = '2';
service cloud.firestore {
  match /databases/{database}/documents {
    // This rule applies specifically to the "attendees" collection.
    match /attendees/{attendeeId} {
      allow read: if true;

      // Deny all write operations (create, update, delete) from the app.
      // This is crucial for security. Only your server-side script should have write access.
      allow write: if false;
    }

    // You can add rules for other collections here in the future.
  }
}
- Click the Publish button to save your new security rules.
Step 5: Google Cloud Setup (Service Account)
For our Google Sheet to write data to Firestore securely, bypassing the read-only rules we just set, it needs administrative credentials known as a “Service Account Key”.
-
Open the Google Cloud Console and ensure your specific Firebase project (
Workshop Registration) is selected in the top dropdown menu.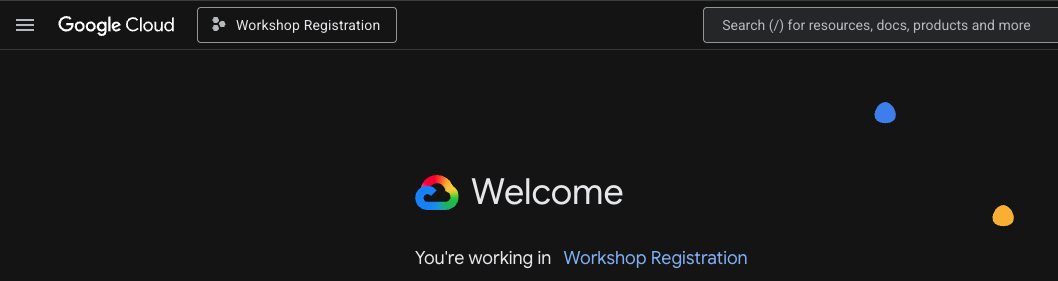
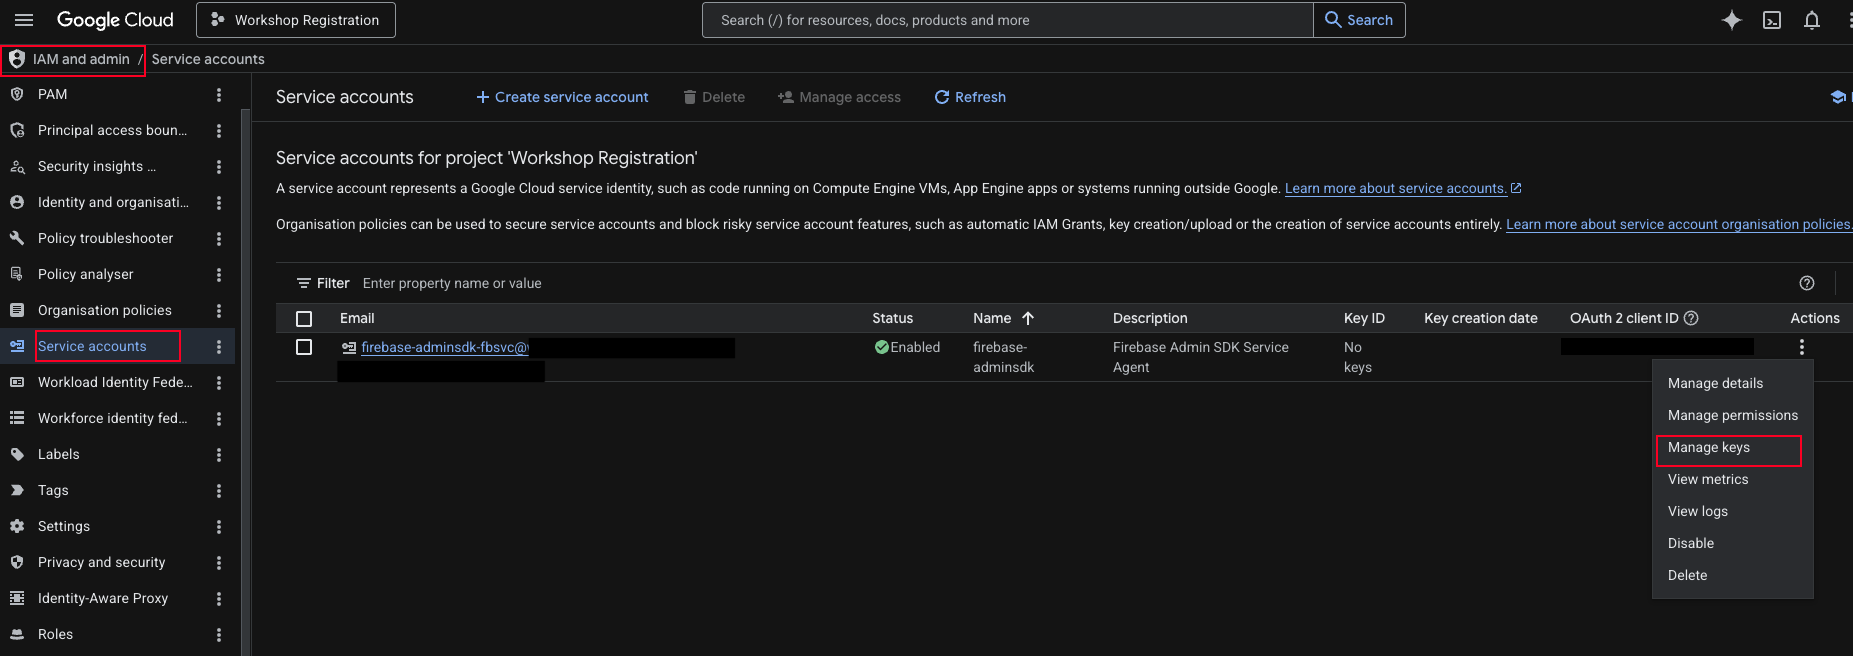
- Open the navigation menu (☰) in the top left, go to IAM & Admin, and select Service Accounts.
- Look for the default service account that has
firebase-adminsdkin its email address (e.g.,firebase-adminsdk-xxxxx@<your-project-id>.iam.gserviceaccount.com). -
Under the “Actions” column for that specific account, click the three-dot menu (⋮) and select Manage keys.
- Click Add Key -> Create new key.
- Leave the format as JSON and click Create.
Important: A JSON file will immediately download to your computer. Keep this file highly secure! It grants full administrative access to your entire Firebase project. We will extract its contents in the next step.
Step 6: The Sheet-to-Firestore “Brain” (Script)
This script is the core engine of our CMS. Attached directly to the Google Sheet, it listens for admin edits and syncs those changes directly into Firestore.
- Open your
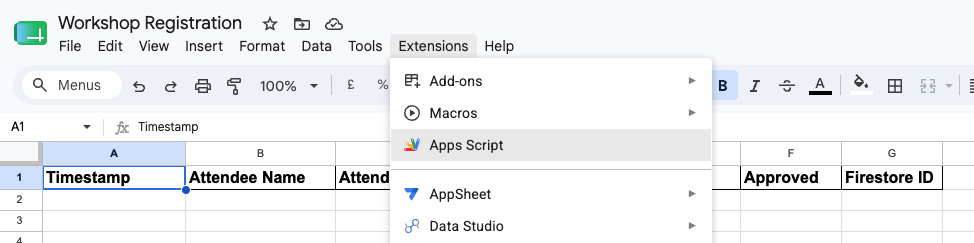
Workshop RegistrationGoogle Sheet. - Go to Extensions -> Apps Script in the top menu bar.
- Replace the boilerplate
Code.gscontent with the massive block of code provided below. - Crucial Step: Open the
.jsonservice account file you downloaded in the previous step using a standard text editor. Copy its entire contents and paste it over theSERVICE_ACCOUNT_KEYobject in the script below. (Note: The private key in the code block below has been truncated for security; replace the entire block!) - Rename the project at the top left to
Workshop Registration Sheet Scriptand click the Save project icon.
// =================================================================
// CONFIGURATION
// =================================================================
const DASHBOARD_SHEET_NAME = "Dashboard";
const STATUS_COLUMN_INDEX = 5;
const APPROVED_COLUMN_INDEX = 6;
const FIRESTORE_ID_COLUMN_INDEX = 7;

// Paste your downloaded service account key here.
// Note: Sensitive data has been truncated in this example below.
const SERVICE_ACCOUNT_KEY = {
  "type": "service_account",
  "project_id": "XXXXXXXXXXXXXXXX",
  "private_key_id": "600eacXXXXXXXXXXXXXXXXXXXXXXXXXXXXXXXXX",
  "private_key":
    "-----BEGIN PRIVATE KEY-----\n[...TRUNCATED FOR SECURITY...]\n-----END PRIVATE KEY-----\n",
  "client_email":
    "firebase-adminsdk-fbsvc@XXXXXXXXXXXXXXXX.iam.gserviceaccount.com",
  "client_id": "107XXXXXXXXXXXXXXXXXXXXXXXX",
  "auth_uri": "https://accounts.google.com/o/oauth2/auth",
  "token_uri": "https://oauth2.googleapis.com/token",
  "auth_provider_x509_cert_url": "https://www.googleapis.com/oauth2/v1/certs",
  "client_x509_cert_url":
    "https://www.googleapis.com/robot/v1/metadata/x509/firebase-adminsdk-fbsvc%40xxxxxxxxxx.iam.gserviceaccount.com",
  "universe_domain": "googleapis.com",
};

// =================================================================
// TRIGGERS
// =================================================================

/**
 * Main trigger that runs when any cell in the Dashboard sheet is edited.
 */
function onSheetEdit(e) {
  const sheet = e.source.getActiveSheet();
  const range = e.range;
  const editedColumn = range.getColumn();
  const row = range.getRow();

  // Ignore edits in other sheets or the header row.
  if (sheet.getName() !== DASHBOARD_SHEET_NAME || row === 1) {
    return;
  }

  const firestoreId = sheet.getRange(row, FIRESTORE_ID_COLUMN_INDEX).getValue();

  try {
    if (editedColumn === APPROVED_COLUMN_INDEX) {
      // Handle CREATE or enabling/disabling an attendee via the "Approved" checkbox.
      handleApprovalChange(sheet, row, e.value, firestoreId);
    } else if (firestoreId && editedColumn < APPROVED_COLUMN_INDEX) {
      // Handle an UPDATE to existing data (e.g., fixing a typo).
      handleDataEdit(sheet, row, editedColumn, e.value, firestoreId);
    }
  } catch (error) {
    sheet
      .getRange(row, STATUS_COLUMN_INDEX)
      .setValue(`ERROR: ${error.message}`);
    console.error(`Error processing edit on row ${row}: ${error.toString()}`);
  }
}

// =================================================================
// CORE LOGIC FUNCTIONS
// =================================================================

function handleApprovalChange(sheet, row, isApprovedValue, firestoreId) {
  const statusCell = sheet.getRange(row, STATUS_COLUMN_INDEX);
  const isApproved = isApprovedValue === "TRUE";

  statusCell.setValue("Processing...");

  if (isApproved) {
    if (firestoreId) {
      // Enabling a previously disabled attendee.
      updateInFirestore(`attendees/${firestoreId}`, {
        fields: { isActive: { booleanValue: true } },
      });
      statusCell.setValue("Active");
    } else {
      // Creating a brand new attendee in Firestore.
      const data = sheet
        .getRange(row, 1, 1, FIRESTORE_ID_COLUMN_INDEX - 1)
        .getValues()[0];
      const newDocument = createInFirestore(
        "attendees",
        buildCreatePayload(data),
      );
      const newFirestoreId = newDocument.name.split("/").pop();
      sheet.getRange(row, FIRESTORE_ID_COLUMN_INDEX).setValue(newFirestoreId);
      statusCell.setValue("Active");
    }
  } else {
    // Deactivating a promotion by unchecking the box.
    if (firestoreId) {
      updateInFirestore(`attendees/${firestoreId}`, {
        fields: { isActive: { booleanValue: false } },
      });
      statusCell.setValue("Inactive");
    } else {
      statusCell.setValue("Pending");
    }
  }
}

function handleDataEdit(sheet, row, column, newValue, firestoreId) {
  const statusCell = sheet.getRange(row, STATUS_COLUMN_INDEX);
  statusCell.setValue("Updating...");

  const header = sheet.getRange(1, column).getValue();
  const firestoreField = mapHeaderToFirestoreField(header);

  if (!firestoreField) {
    throw new Error(`Unknown column: ${header}`);
  }

  const valuePayload = formatValueForFirestore(newValue, firestoreField.type);
  const payload = { fields: { [firestoreField.name]: valuePayload } };

  updateInFirestore(`attendees/${firestoreId}`, payload);
  statusCell.setValue("Active (Updated)");
}

// =================================================================
// MAINTENANCE MENU FUNCTIONS
// =================================================================
/**
 * Adds a custom "Maintenance" menu to the Google Sheet UI when it's opened.
 */
function onOpen(e) {
  SpreadsheetApp.getUi()
    .createMenu("Maintenance")
    .addItem("Archive Selected Row(s)", "archiveSelectedRows")
    .addSeparator()
    .addItem("Cleanup (Remove Blank Rows)", "cleanupEmptyRows")
    .addToUi();
}

function archiveSelectedRows() {
  const ui = SpreadsheetApp.getUi();
  const sheet = SpreadsheetApp.getActiveSpreadsheet().getActiveSheet();
  const selection = sheet.getActiveRangeList();
  if (!selection) {
    ui.alert("Please select row(s) to archive.");
    return;
  }

  const response = ui.alert(
    "Confirm Archive",
    `Are you sure you want to archive the selected attendee(s)? They will be permanently deleted from Firestore and this sheet.`,
    ui.ButtonSet.YES_NO,
  );

  if (response == ui.Button.YES) {
    const ranges = selection.getRanges();
    ranges.sort((a, b) => b.getRow() - a.getRow()); // Sort descending to avoid index shifts.

    ranges.forEach((range) => {
      const row = range.getRow();
      const statusCell = sheet.getRange(row, STATUS_COLUMN_INDEX);
      const firestoreId = sheet
        .getRange(row, FIRESTORE_ID_COLUMN_INDEX)
        .getValue();

      try {
        statusCell.setValue("Deleting...");
        if (firestoreId) {
          deleteFromFirestore(`attendees/${firestoreId}`);
        }
        sheet.deleteRow(row);
      } catch (error) {
        statusCell.setValue(`DELETE ERROR: ${error.message}`);
      }
    });
  }
}

function cleanupEmptyRows() {
  const ui = SpreadsheetApp.getUi();
  const sheet =
    SpreadsheetApp.getActiveSpreadsheet().getSheetByName(DASHBOARD_SHEET_NAME);
  const response = ui.alert(
    "Confirm Cleanup",
    "This will remove all completely blank rows from the sheet. Are you sure?",
    ui.ButtonSet.YES_NO,
  );

  if (response == ui.Button.YES) {
    const maxRows = sheet.getMaxRows();
    const range = sheet.getRange(1, 1, maxRows, sheet.getMaxColumns());
    const values = range.getValues();
    const nonEmptyRows = values.filter((row) => row.join("").length > 0);

    sheet.clearContents();
    sheet
      .getRange(1, 1, nonEmptyRows.length, nonEmptyRows[0].length)
      .setValues(nonEmptyRows);
  }
}

// =================================================================
// HELPER & FIRESTORE API FUNCTIONS
// =================================================================

function mapHeaderToFirestoreField(header) {
  const map = {
    "Attendee Name": { name: "name", type: "stringValue" },
    "Attendee Location": { name: "location", type: "stringValue" },
    "Meal Preference": { name: "mealPreference", type: "stringValue" },
  };
  return map[header];
}

function formatValueForFirestore(value, type) {
  if (type === "booleanValue") return { [type]: value === "Yes" };
  return { [type]: value };
}

function buildCreatePayload(data) {
  const expiryDate = data[5];
  return {
    fields: {
      name: { stringValue: data[1] },
      location: { stringValue: data[2] },
      mealPreference: { stringValue: data[3] },
      isActive: { booleanValue: true },
    },
  };
}

// --- OAuth2 and Firestore REST API Functions ---

var _accessToken; // Simple caching
function getAccessToken() {
  if (_accessToken) return _accessToken;
  const key = SERVICE_ACCOUNT_KEY;
  const jwtHeader = { alg: "RS256", typ: "JWT" };
  const now = Math.floor(Date.now() / 1000);
  const jwtClaimSet = {
    iss: key.client_email,
    scope: "https://www.googleapis.com/auth/datastore",
    aud: "https://oauth2.googleapis.com/token",
    exp: now + 3600,
    iat: now,
  };
  const toSign =
    Utilities.base64EncodeWebSafe(JSON.stringify(jwtHeader)) +
    "." +
    Utilities.base64EncodeWebSafe(JSON.stringify(jwtClaimSet));
  const signature = Utilities.base64EncodeWebSafe(
    Utilities.computeRsaSha256Signature(toSign, key.private_key),
  );
  const signedJwt = toSign + "." + signature;
  const response = UrlFetchApp.fetch("https://oauth2.googleapis.com/token", {
    method: "post",
    contentType: "application/x-www-form-urlencoded",
    payload: {
      grant_type: "urn:ietf:params:oauth:grant-type:jwt-bearer",
      assertion: signedJwt,
    },
  });
  const data = JSON.parse(response.getContentText());
  _accessToken = data.access_token;
  return _accessToken;
}

function createInFirestore(collectionName, payload) {
  const accessToken = getAccessToken();
  const projectId = SERVICE_ACCOUNT_KEY.project_id;
  const url = `https://firestore.googleapis.com/v1/projects/${projectId}/databases/(default)/documents/${collectionName}`;
  const response = UrlFetchApp.fetch(url, {
    method: "post",
    contentType: "application/json",
    headers: { Authorization: "Bearer " + accessToken },
    payload: JSON.stringify(payload),
    muteHttpExceptions: true,
  });
  const responseBody = response.getContentText();
  if (response.getResponseCode() >= 400)
    throw new Error(`Firestore API Error: ${responseBody}`);
  return JSON.parse(responseBody);
}

function updateInFirestore(documentPath, payload) {
  const accessToken = getAccessToken();
  const projectId = SERVICE_ACCOUNT_KEY.project_id;
  const fieldPaths = Object.keys(payload.fields);
  if (fieldPaths.length === 0) return;
  const updateMaskQuery = fieldPaths
    .map((field) => `updateMask.fieldPaths=${field}`)
    .join("&");
  const url = `https://firestore.googleapis.com/v1/projects/${projectId}/databases/(default)/documents/${documentPath}?${updateMaskQuery}`;
  const response = UrlFetchApp.fetch(url, {
    method: "patch",
    contentType: "application/json",
    headers: { Authorization: "Bearer " + accessToken },
    payload: JSON.stringify(payload),
    muteHttpExceptions: true,
  });
  if (response.getResponseCode() >= 400)
    throw new Error(`Firestore API Error: ${response.getContentText()}`);
}

function deleteFromFirestore(documentPath) {
  const accessToken = getAccessToken();
  const projectId = SERVICE_ACCOUNT_KEY.project_id;
  const url = `https://firestore.googleapis.com/v1/projects/${projectId}/databases/(default)/documents/${documentPath}`;
  const response = UrlFetchApp.fetch(url, {
    method: "delete",
    headers: { Authorization: "Bearer " + accessToken },
    muteHttpExceptions: true,
  });
  const responseCode = response.getResponseCode();
  if (responseCode >= 400 && responseCode !== 404) {
    throw new Error(`Firestore API Error: ${response.getContentText()}`);
  }
}
Activating the Sheet Trigger
Just as we did for the form script, we need to bind this script to edit events inside our Google Sheet.
- In the Apps Script editor for your Sheet, click the Triggers icon (clock) on the left sidebar.
- Click + Add Trigger.
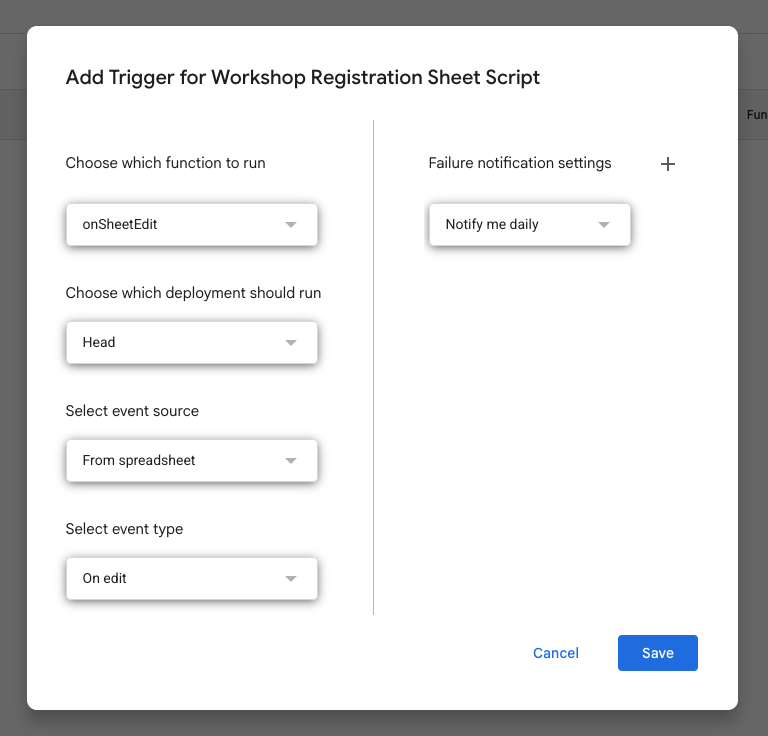
- Configure the trigger with these exact settings:
- Choose which function to run:
onSheetEdit - Select event source:
From spreadsheet - Select event type:
On edit
- Choose which function to run:
- Click Save.
- Follow the exact same authorization flow as before (click Advanced -> Go to script (unsafe) -> check “Select All” -> hit Continue).
- Once returned to the triggers page, your Sheet-to-Firestore connection is live!
Step 7: Testing Your Pipeline
Time to watch the automation unfold in real time!
- Go back to your
Workshop RegistrationGoogle Form. - Click the Publish (or Send) button in the top right, select the Link tab, and click Copy (you can also check “Shorten URL” if preferred).
- Open this form URL in a new browser tab.
-
Fill out the form with sample data for the Name, Location, and Meal Preference fields, then click Submit.
- Switch over to your Google Sheet. Almost immediately or sometime within a few seconds, you will see a new row automatically appear!
- Notice that the Status in column
Edefaults toPending. -
A checkbox automatically generates in the Approved column
F.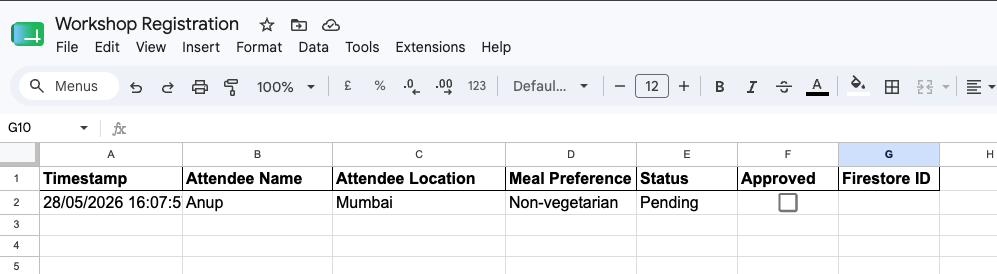
- Notice that the Status in column
- Go check your Data tab of your Firestore Database. Right now, it should be entirely empty.
- Back in your Google Sheet, click the Approved checkbox in column
F.- The Status column will temporarily say
Processing...before switching toActive. -
The Firestore ID column will populate with a unique alphanumeric string.
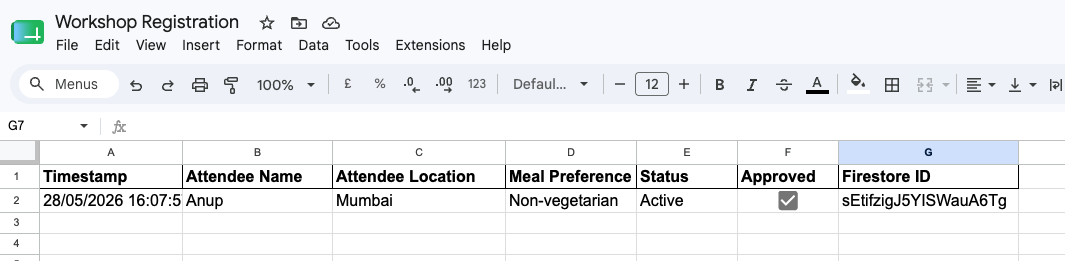
- The Status column will temporarily say
-
Switch back to your Data tab of your Firestore Database and refresh the page. You will now see an
attendeescollection containing a new document! The document ID matches your sheet perfectly, and all the data is live.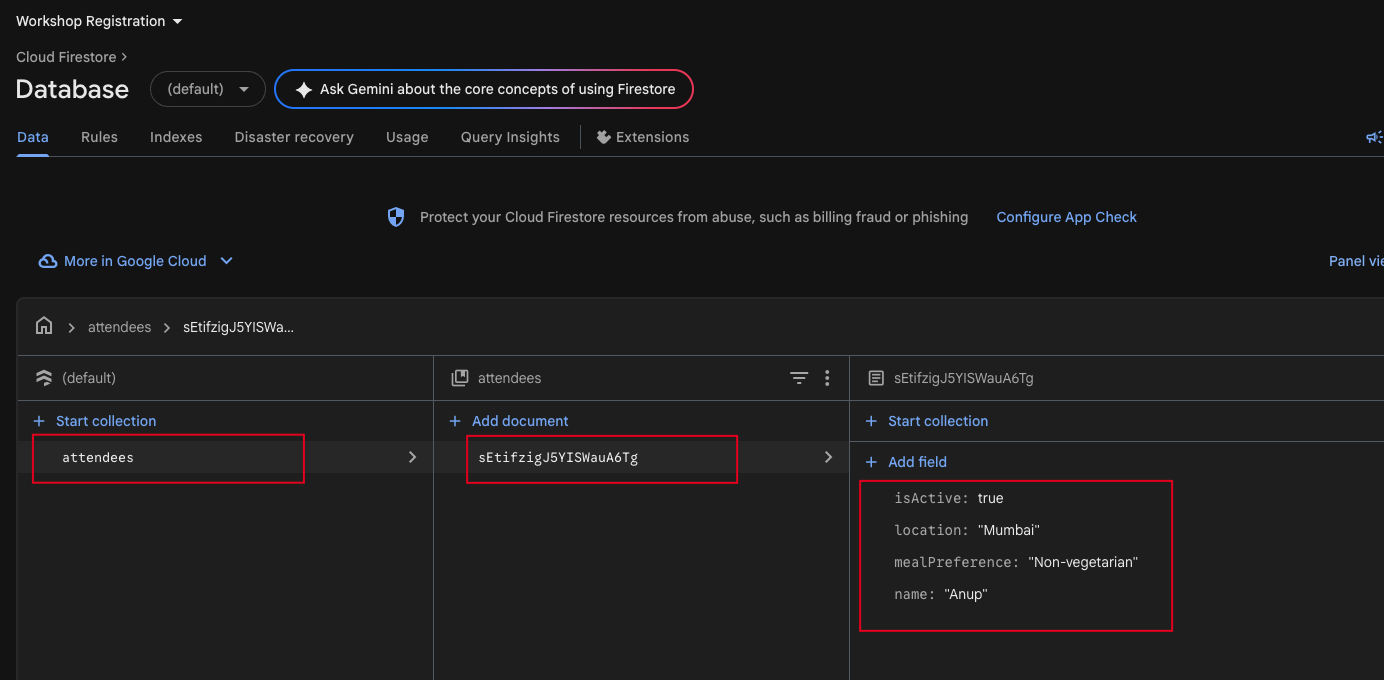
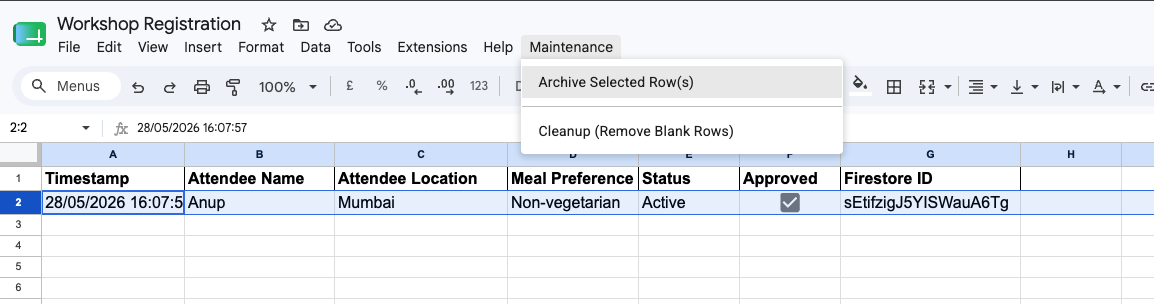
Bonus Feature: Did you notice the new Maintenance menu that appeared in your Google Sheet’s toolbar alongside Help?
- Clicking Archive Selected Row(s) lets you safely delete an entry from both your Google Sheet and your Firestore database simultaneously.
- Clicking Cleanup (Remove Blank Rows) easily removes any empty gaps left behind when you archive rows, keeping your sheet tidy.
Conclusion
Voila! You have successfully built a custom, low-maintenance automation pipeline. By connecting Google Forms to a Google Sheet, and using Apps Script as a bridge to Firebase, you’ve created a system where non-technical users can safely manage a live database without ever needing to touch the backend console directly.
A quick caveat on scalability: While this is a fantastic, cost-effective method for managing a few hundred rows of straightforward data (like workshop registrations, simple feedback forms, or basic promotions), it is not recommended for complex, highly relational data collections or massive datasets. Google Sheets and Apps Script have execution and rate limits that aren’t suited for heavy enterprise use.
However, for lightweight, flat-data tasks, this setup is incredibly powerful and can easily feed data directly into your mobile apps, websites, or internal dashboards!
Consider subscribing to my YouTube channel & follow me on X(Twitter).
If you have any questions or ran into any issues along the way, feel free to leave a comment below. Share this article if you found it useful!