
Photo by Jonathan Bowers on Unsplash
The Problem
While integrating WeatherKit into a SwiftUI app, I kept running into the following error:
Failed to generate jwt token for: com.apple.weatherkit.authservice
Error Domain=WeatherDaemon.WDSJWTAuthenticatorServiceListener.Errors Code=2 "(null)"
❌ Failed to fetch weather
At first glance, this feels like a bug in your networking or WeatherKit usage.
It isn’t.
Inspite of the Swift code being correct, there are other reasons for this error to crop up.
One such reason is a missing configuration step in Apple’s signing and entitlement pipeline and it’s one of the most common (and frustrating) WeatherKit setup issues.
Why This Error Happens
Before your app can fetch weather data, Apple requires a secure authentication handshake.
That handshake involves:
- Generating a JWT (JSON Web Token)
- Signing it with your app’s cryptographic credentials
- Verifying that your App ID is explicitly allowed to use WeatherKit
If any part of this chain is missing, WeatherKit fails immediately, which is exactly what this error is telling you.
In short:
This is not a runtime bug since the code is pretty standard for simple requests.
This is not a simulator issue as other’s online will likely attribute it to i.e. not testing on a real device.
✅ This is a capability + App Services configuration problem which is not immediately clear!
The Complete Fix: WeatherKit Configuration Checklist
Follow all of these steps carefully. Skipping even one will keep the error alive.
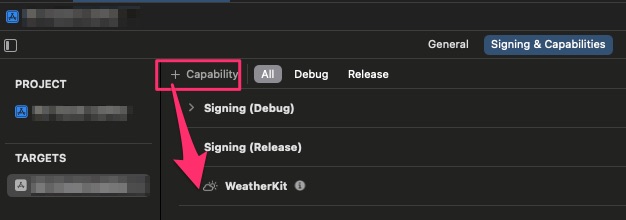
Step 1: Enable WeatherKit Capability in Xcode
This is the most common failure point.
- Open your project in Xcode
- Select your app target
- Go to Signing & Capabilities
- Click + Capability
- Add WeatherKit
If WeatherKit is already listed, move on to the next step.
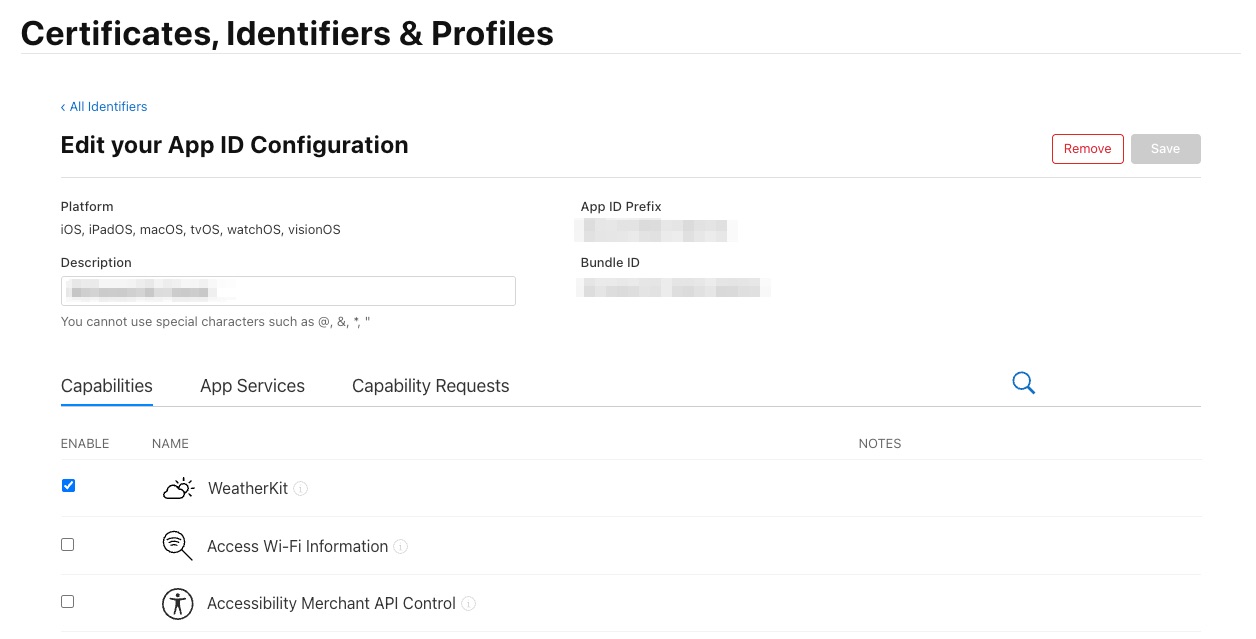
Step 2: Select the App Identifier in the Developer Portal
This step is easy to miss but mandatory.
- Log in to Apple Developer Portal
- Go to Certificates, Identifiers & Profiles
- Click Identifiers
- Select your App Identifier (this step matters, don’t skip it)
Once the App ID is selected, proceed to the next step.
Step 3: Enable WeatherKit Under App Services (Critical Step)
This was the final missing piece that fixed the error for me.
Even if WeatherKit is enabled as a capability via Xcode, check to ensure that it is enabled under Capabilities, it must also be enabled under App Services.
- With your App Identifier selected
- Open the App Services section
- Enable WeatherKit
- Save your changes
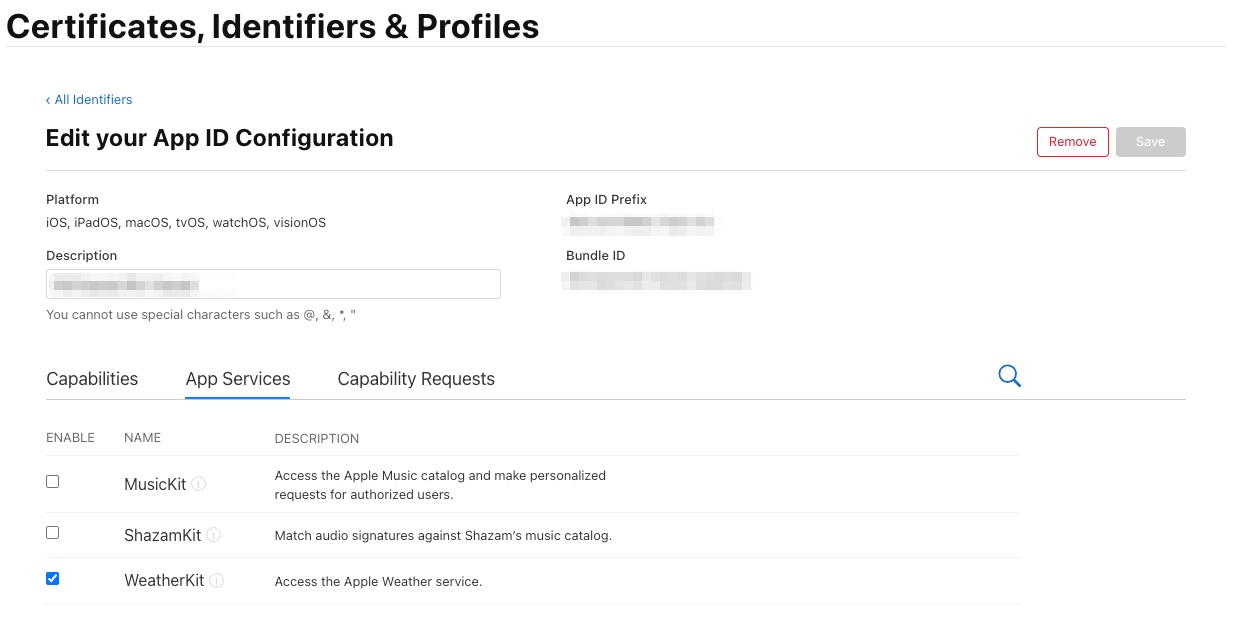
Without this step, JWT generation will always fail even though Xcode looks correctly configured.
Step 4: Refresh Provisioning Profiles
After changing capabilities or App Services, Xcode often uses stale profiles.
- Open Xcode → Settings
- Go to Accounts
- Select your Apple ID
- Select your team
- Click Download Manual Profiles
Step 5: Clean, Restart, and Test
Do a full reset to clear cached signing data:
- Clean Build Folder
Shift + Command + K - Quit Xcode
- Restart the Simulator
- Relaunch Xcode and run again
Note:
Simulators may occasionally fail WeatherKit authentication even when everything is configured correctly.
Although it is recommended to test on a physical iOS device but in my experience I’ve had success with the simulator just as well.
Why This Works
WeatherKit authentication is enforced at multiple levels:
- Xcode capabilities
- App ID entitlements
- App Services permissions
- Provisioning profiles
All four must align perfectly for JWT generation to succeed.
Once they do, WeatherKit “just works.”
Final Takeaway
If you see:
Failed to generate jwt token for com.apple.weatherkit.authservice
Remember this:
If your Swift code is probably fine, this is very likely a configuration issue.
Ensure that App Services must be enabled, not just capabilities.
This checklist should save you hours of confusion the next time you wire up WeatherKit.
Consider subscribing to my YouTube channel & follow me on X(Twitter). Leave a comment if you have any questions.
Share this article if you found it useful !


